
Guest writer: Darkrose#1437
A lot of people consider using references cheating. They think that you didn’t draw it yourself but stole it from another person. What if I told you that this is not the case at all? References, after all, can be an invaluable tool for artists. I will explain and show you that even from a simple reference, you can create your own drawing without it looking like you “stole” it from someone else.
Not only can references give us an idea of how we want our original characters to look, they can also be a very handy tool to help us learn new thing as artists. For example, if you have trouble drawing in ¾ view, full body or even chibis, you can take an existing picture and work from there to make it your own original drawing by simply using the pose as reference.
Choosing your reference
First we have to decide what we want to draw. My specialty is males, so lets take an existing male character. If you’re new to drawing ¾ views of a face and you don’t know how to draw a male character in that way, then you can find an existing image that fits the pose you want to achieve.

We can easily take this drawing and make it our own. You can find pictures by casually scrolling through Pinterest or Google and just pick the one you like. As you can see, I chose Kagamine Len from Vocaloid.
Drawing guidelines
 What we will first do is analyze how the character was originally drawn. We can see that the head is shaped like an oval and that the neck is rectangular, for example. In your rough draft, don’t draw too many details as you only need the sketch of an outline to help position and proportion the head and body.
If you aren’t good at knowing where to place the eyes, you can add gridlines to guide you. With the first line, sketch it vertically from the top of the circle to the area where the chin will be. This line also separates the two eyes. The first horizontal line is at the top of the ears and the second at the bottom of the ears. In between these two lines, we will draw the eyes.
Male bodies have broad shoulders so make sure they’re not too small or our character might end up looking more feminine. Don’t worry if the body looks static since these are just the outlines to determine the position and perspective you will draw.
Drawing details
Now it’s time to personalize our character. Let’s make this one a 15 year old boy wearing a simple T-shirt. First you start with a sketch of how your character will look like.
 Start out simple for your sketch. You don’t want to add too much detail just yet since we’re still figuring out the basic outline of how we want him to look. You can add details later when you start shading and coloring the sketch.
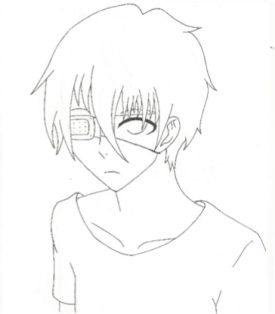
We will keep the pose but just change little details like adding the hair and the eyes. I added a little eyepatch on the right eye, which is a nifty trick you can use if symmetry is a problem.
As you can see with this sketch. You can no longer see that this was originally Kagamine Len, but that the pose is still the same as the original. We just changed the core details.
Finishing your drawing
 And now you can finish drawing the character using whichever medium you prefer, whether it’s pencils, markers, water colors, etc. For this example, I’ll just use plain graphite pencils.
While shading, just keep one important thing in mind. Start very light and then build it up to as dark as you want it to be. It is easier to darken details than it is lighten them.
Also, try to use different kinds of graphite pencils. In school, there’s typically B2 grade pencils, but there are also B4, B6 and so on. A different graphite grade will mean a softer or harder material resulting in darker or lighter pencil markings. For example a B8 pencil will have a darker effect than a B2 pencil.
Drawing chibis


Of course there are more ways to draw from a reference. In this next example, I will show you how to draw a chibi from reference to make an original character design.
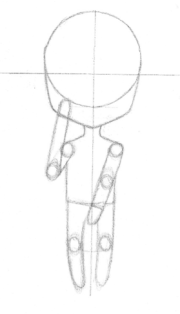
We will once again use Kagamine Len, but in chibi format. Have you always wanted to create your own cute little chibi? I’ll be using Len and do the same as we did with our first example. Analyze the character’s basic shapes and sketch the base lines.
As you can see, chibis have a large head and a body that is approximately 1,5 times the size of the head. In the first example we used, we drew simple lines to outline the head and body. Do the same thing and outline the body and head of the chibi. Once again, don’t add any details yet. You can see I drew circles at the arms and legs. These are points where there would normally be joints and this will help you determine proportions and perspectives.
A chibi’s eyes are huge, unlike when you draw them normally. Also, when drawing a chibi character, the details are minimal. Not only does this make them easier to draw them, it gives them a look that’s unique to chibi designs. Since the rest of the body has fairly few details, the eyes will stand out more.
Once the outline is finished, just as before, you can start to color your chibi. I used graphite pencils last time, so let’s just do the same thing and see how both character drawings differ even though I used the same medium.
Conclusion
As you can see, drawing from reference isn’t always a bad thing. On the contrary, it can help beginning and experienced artists alike to improve their skills. I hope this little guide of mine was useful to all of you, and if you want more information about how to use references, I suggest watching the following video of a YouTuber talking about his experiences when it comes to the use of references.
YouTuber: mikeymegamega
For further reading, you can check out Shattered-Earth on DeviantArt.

One thought on “Using References”